
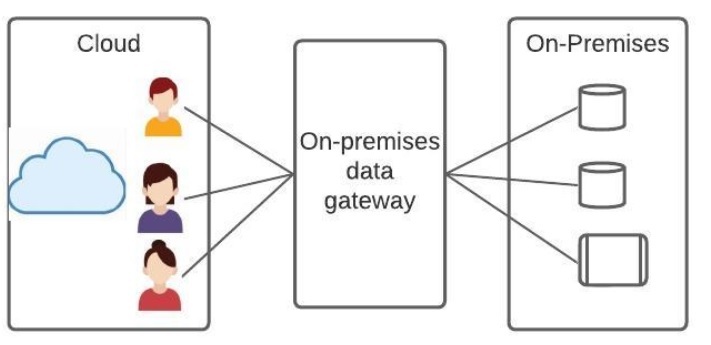
PowerApps is hosted in the Azure cloud, so it is not straightforward to access the on-premise network, but it’s easy. To connect on-premises, Microsoft introduced an “On-premises data gateway.”
What is On-premises Data Gateway
“The on-premises data gateway acts as a bridge to provide quick and secure data transfer between on-premises data and several Microsoft cloud services”.
Azure cloud services include Power Apps, Power BI, Power Automate, Azure Analysis Services, and Azure Logic Apps.
Types of Gateways
- On-premises data gateway allows multiple users to connect to multiple on-premises data sources. You can use an on-premises data gateway with all supported services with a single gateway installation. This gateway is well-suited to complex scenarios with multiple people accessing multiple data sources.
- On-premises data gateway (personal mode) allows one user to connect to sources and can’t be shared with others. An on-premises data gateway (personal mode) can be used only with Power BI. This gateway is well-suited to scenarios where you’re the only person who creates reports and doesn’t need to share any data sources with others.
How the gateway works

- Any one of the cloud services (for example, PowerApps) sends the request to a Gateway cloud service.
- The gateway cloud service creates a request along with the encrypted credentials for the data source and sends the request to the queue for the gateway to process.
- The gateway cloud service pushes the request to the Azure Service Bus. (Azure Service bus is a queue-based processing system)
- The on-premises data gateway polls the Azure Service Bus for any pending requests, decrypts the credentials, and connects to the data source with those credentials.
- The gateway sends the request to the data source.
- The results are sent from the data source back to the gateway and then to the gateway cloud service.
- Final results are utilized in cloud service
Install the On-premises data gateway
- Download On-Premises data gateway from Microsoft download
- Install the downloaded gateway on the server or VM or (local computer for testing)
- Connect Azure work or school account
- Set up the recovery key
- For high availability, make sure to configure the gateway cluster
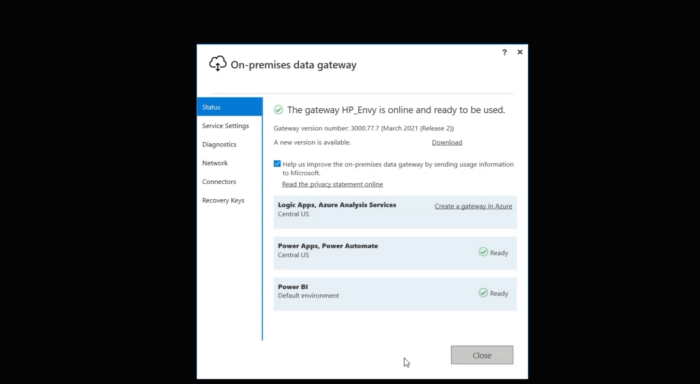
- We should see a new Gateway connection on PowerApps
- Go to PowerApps
- On the left navigation, Expand “Data.”
- The new gateway should be listed with the name we installed (As per this demo, “HP_Envy”)
Connect On-premises SQL Server
Now, connect power automation to the on-premises data sources. We need to create a connection using that gateway. We can create in two ways.
- Make a New Connection to the SQL Server
- Create flow and access the SQL server, which will create a connection

Test the Data Source
Test the on-premises gateway by creating a flow with SQL connection. We have flow, which has two steps.
- Call the stored procedure “GetEmployee”
- Call the stored procedure with the parameter “GetEmployeeByDepartment”

Supported Data Sources
This on-premises data gateway supports the below data sources
- BizTalk Server 2016
- File System
- IBM DB2
- IBM Informix
- IBM MQ
- MySQL
- Oracle Database
- PostgreSQL
- SAP
- SharePoint Server
- SQL Server
- Teradata
Other things to consider or remember
- For one server/machine, only one gateway is sufficient
- Make sure the system is up and running when connecting data from the cloud
- There are no inbound connections on this pattern. Gateway uses outbound connections
- Gateway polls the request from Azure Service Bus
- Verify the firewall and proxy
I have installed the on prem data gateway on a server and it keeps going off every time.