
This blog will discuss how to achieve write back (writeback) functionality when data is in Azure Synapse and no additional information is needed to display it in PowerApps. We have been discussing writeback functionality through
- Power BI writeback functionality comparison
- Writeback to Synapse using PowerApps – workaround (Part 1)
Business Requirement
In some cases, data are in Azure Synapse and need write-back functionality. Power BI has a connector to Azure Synapse for reports and visualization, but PowerApps does not.
In the previous blog, we discussed copying the data to Azure SQL so that any additional information can be displayed from SQL. For example, Power BI displays some analytical visualization/graphs about companies. Based on the company selection business expects to display some additional information. In this case, we can store any additional information in Azure SQL from Synapse.
Solution
Since PowerApps has no connector to Synapse, we can’t directly connect. Workaround to have an Azure SQL Server in the middle, which is only used for writeback.
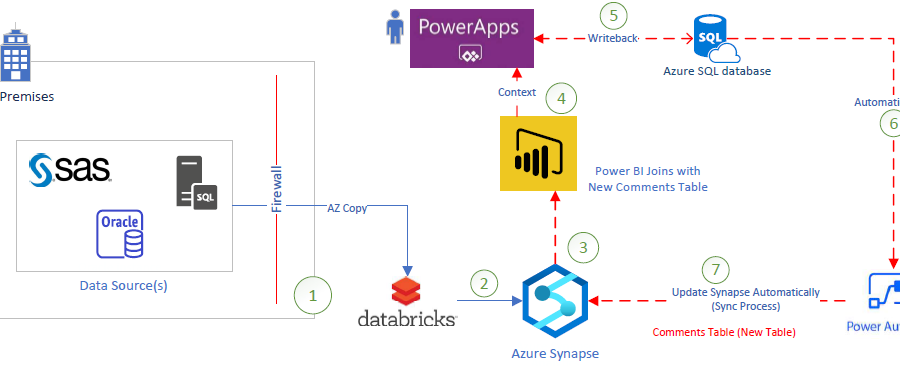
Architecture
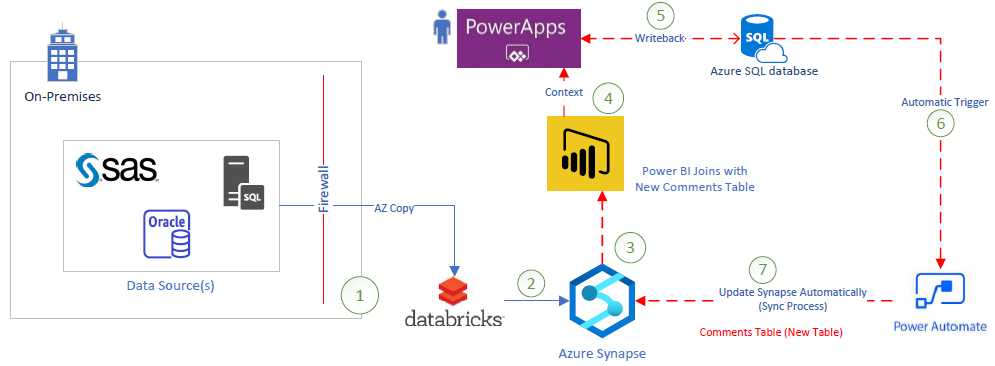
- Using AzCopy moves the data from on-premises to Azure Synapse
- Databrick saves data to Synapse
- Power BI uses DirectQuery to Azure Synapse
- Power BI passes the context to Powerapps. PowerApps display the information through Power BI context
- PowerApps has a connector to Azure SQL to have writeback
- Power Automate automatically triggers for any update that happens
- Power Automate update Synapse
- New table with proper keys
- Power BI joins this new writeback table and displays it
Power Automate Steps
- Power Automate get triggered when an update event happens in Azure SQL
- Send this data to another table (History) for Auditing
- Get a record from Synapse for that Id
- Verify record exists for that id
- Insert new row/record if not exists
- Update the record if exists
Sample Flow (Click an image to enlarge)

Formula Used on the Flow
empty(outputs(‘Get_rows_from_Synapse’)?[‘body/value’])
Note: Insert and Update to Synapse uses the “Execute a SQL query” action
So what is the difference (Part 1 & Part 2)
No need to copy data from synapse to Azure SQL if no additional information is needed to display in PowerApps. We use Power BI context to display data in PowerApps. So Azure SQL will be used only to store write back data.
Conclusion
- For Power BI, the data source will be only Azure Synapse and user interaction is very smooth when using the “PowerApps embedded in Power BI” method.
- In this approach, we minimize copying the data from the source.
Can you please give details for Execute a sql query action. Not sure how to use it. Your help will be much appreciated.
Make sure to select ‘Azure SQL Data Warehouse’ and select the action as ‘Execute a SQL Query (V2)’.
And execute SQL will be our regular SQL update like
Update TableName
Set ColumnName= ‘value1’
Where UniqueID = IDValue